Friday, January 30, 2015

My Pretty Sylvari

I love her.

Found a good color scheme for my tier 1 cultural armor: Blue Ice, Lilac, and Mountain Sky.

My absolute favorite set that I've had so far was the Feathered Headpiece, Student Mantle, Magician Coat, Student Gloves, Magician Legs, and Magician Shoes. All with the color-scheme of Pastel Lemon, Blue Ice, and Fog.

I seriously want a makeover kit though because I want to see what other hair and faces I can do with her. I feel like I want something more interesting for her face. Maybe the one without a nose? Not sure.

GW2 Beginner Dos and Don'ts.

Because it seems like there's probably / probably will be an influx of new players onto GW2 due to the announcement of the expansion, I wanted to write a newbie guide. I've been meaning to get around to it for a while, and it's possible in the works right now, maybe. But I thought I might start off by writing out a quick Dos and Don'ts list. Just a quick rundown. Maybe I'll polish this up later and just have this be my newbie guide. Not sure yet. Haven't planned that far ahead.

DO
  • Do pick up a class that looks / sounds interesting to you. If you have no interest in a Warrior, don't play a Warrior. If you get into the game and see a whole bunch of other Warriors and it looks like fun, then make a Warrior and try it out.
  • If you've played any other MMOs, think about what classes you liked to play. Using WoW as an example, the best equivalents I can think of are Paladin = Guardian, Warrior = Warrior, Mage = Mesmer, Shaman = Elementalist, Warlock = Necromancer, Rogue = Thief, Hunter = Ranger, and Engineers also have some similarities with Shamans because Totems = Turrets.
  • Do Gather out in the world. It does not waste any time because you gain experience from it (and not gathering experience, actual player level experience), and you'll need all the materials you can get.
  • On that note, do pick up two useful Crafting abilities. They are somewhat tedious, but they can help level up your character, and they are very valuable a max level. There's plenty of people who have gotten to max level just through crafting, so it does give you pretty decent experience.
  • Do try out all the possible weapons for your class. Find one that you love and the game will be more fun for you. For example, I love Scepter for Mesmers; I find it incredibly fun, and even better when paired with a Sword.
  • Do purchase cheap Food off the Black Lion Trading Company. There's a whole lot of Food that can be bought for less than 10 Copper. Just go to Trading Post > Buy Items > Other > Food Effects, and then find where it says Price and click on that to filter by Price, with the cheapest Foods being at the top. While leveling, don't worry about which foods you buy so much because you only really need them for the exp bonus from Nourishments. Actually useful stat bonuses will come at max level.
  • Do complete all your Vistas, Skill Challenges, Hearts, and all other Map Completion. I know, I know, it can be tedious, but it gets you exp and free Transmutation Charges. And doing it as you're going through the area is so much easier than coming back to do it later.
  • Do pick a race that you like. The benefits of the racial utilities aren't worth not liking the race itself.
  • That said, do look at the customization options or each race. I thought I would only like Humans until I really looked at the Sylvari customization options, and now my Sylvari characters far outnumber my Human ones!
  • Do save all crafting materials, even if they aren't applicable to your current crafting abilities. You can store them in your crafting storage and use them on a different character (Hint! In your inventory, click on the little cog wheel and then Deposit All Materials to deposit any materials in your inventory to the crafting storage automatically).
  • Do salvage everything you can. Armor and weapons that you can't use (wrong armor/weapon type, lower stats than your current gear, etc) are commonly salvageable. There's also some items that you pick up out in the world that can be salvaged into crafting materials.
  • If you find an interesting item, do check out the Black Lion Trading Company to see how much it is worth so you can weigh your options. Salvage or sell?
  • Do look over the common viable builds for your class. This information can be found easily on the official forums. For PvP, look in the PvP forums for a thread called "New to PvP? Start here!". For PvE, check your class forums (listed under Professions). For specific thread titles: Elementalists should look for "Zelyhn's Advanced D/F" and "DPS Elementalist for PvE." Engineers should check "The Engineer Handbook." Guardians get three; "Guardian 101 - A Beginner's Text," "DPS Guardian for PVE," and "Guardian - Frequently Asked Questions." Mesmers should check out "Find your Mesmer Builds & Guides," "Lyssa's Grimoire: The Mesmer Handbook," and "How to Mesmer in Dungeons." Necromancers should look for "DPS Necro for PvE." Rangers need "New to Rangers? Looking for guides? CLICK ME!". Thieves should look for the "Guide to Thief Guides." And Warriors apparently don't have a guide, so check out the "Post Your Build Thread" for some inspiration, I guess...
  • On that note, check out your class forums every so often; they are often filled with valuable information as to how your class is doing in all facets of the game, as well as how to improve your own playstyle.
  • Do mess around with builds and Utilities in the PvP Lobby. To get there, click on the crossed swords on the top left of your screen, and click Enter PvP Lobby. Here, your effectively level 80 and so have access to all Talents and Utilities. There's training dummies for you to mess with your build and get a feel for it as well.
  • Do learn how to dodge properly. I find practicing in underwater combat to be a bit easier than practicing out in the world because there are more ways to avoid attacks underwater and get used to dodge timing.
  • Do learn how to switch weapons/kits/attunements strategically. If you are commonly using only one of your weaponsets (attunements for Elementalists), then you are probably doing something wrong. The exception for this is sometimes Engineers because Engineers are weird and are often built specifically for a certain kit.
  • Do complete any nearby events with the exception of anything with the word "Toxic" in it. Events give you experience and items, and can sometimes give you credit towards Heart completion as well. Toxic events should be avoided at early levels unless there are a ton of players doing it, as they are generally more difficult (with the exception of Toxic Spider Queen because there's almost always other players there and/or you can call for help and people will almost always come).
  • If you've never played an MMO, then do try out PvP and PvE. You may enjoy one over the other, and both are viable ways of leveling up and obtaining gear.
  • Do try out World versus World. It can be a fun thing to do if you get into it.
  • Do carry a weapon or equip a utility that allows you to give yourself Swiftness.
  • Do learn about your Utilities and the best times to use them.
  • Do keep Nourishment up on yourself whenever you will be killing enemies. You can get Nourishment by eating Food.
  • Do open Black Lion Chests when you obtain Black Lion Keys. 1 Key = 1 Open Chest. You cannot sell Keys so this is their only purpose. If you don't have any chests, they can be bought on the Black Lion Trading Company for about 30 Copper or so.
  • Do learn how to play your chosen class. Check out your class forums for this.
  • Do use your 5 character slots to try out different classes. You don't have to keep all the characters, but it's good to try things out.
DON'T
  • Don't pick a class just because it's supposed to be the "best." For MMOs, the best class is never permanently the best. The "best" classes change with every balance patch. It is best to pick a class that you enjoy many parts of, and that you feel like you can stick with no matter what happens balance-wise. Added onto this, every class has its niche. Necromancers may be terrible in dungeons right now, but they are very good in PvP and WvW. Also, who knows what will happen in the expansion, what with he class Specializations being thrown into the mix! Best to pick something you enjoy rather than the "flavor of the month."
  • Don't pick professions that aren't useful to you. Armorsmithing on a Mesmer isn't really useful, but Tailoring is. Likewise, Tailoring is near useless on a Guardian, but Armorsmithing is useful.
  • Don't forget to replace your Gathering equipment and Salvage kits every once in a while! Those things are limited-use, you know!
  • Don't box yourself in to a single set of weapons. All classes except for Elementalists and Engineers can switch between two sets at any time, and you can always carry more weapons in your inventory for situational equipping.
  • Don't attempt Jumping Puzzles until you have perfected the art of jumping. If you don't know what these are yet, then don't worry about it until you can get up to Vistas without an issue. Once you're confident in your jumping abilities, look them up. Attempting them without being good at jumping will only cause many, many deaths for your poor character.
  • Don't pick your race based on Racial utility skills. They aren't worth it for a race that you don't like.
  • Don't feel boxed into the "meta" build. Meta builds are best for speed-running dungeons, but it is possible to find a dungeon group that will accept any build. Or, you could make your own group!
  • Don't feel like you have to follow a build to the letter. There is generally some wiggle-room unless you really have your heart set on the Meta build.
  • Don't make nonsensical builds either though. An Elementalist that only uses a Staff will not benefit from a trait that increases the attack power of Daggers. A Mesmer that never uses Mantras will not benefit from Mantra Traits. Things like that. Use common sense, basically.
  • Don't stay still if an enemy is obviously charging an attack. If an enemy looks like they're about to strike, dodge, guard, counter, or otherwise try your best to avoid damage. This game is very movement-reliant and almost all damage can be avoided. For that matter, if you have an ability/utility to do so, remove any Conditions that have been applied to you.
  • Don't stand in red circles on the ground. This goes with the above, except for one difference: If you don't dodge a normal attack in time people will not be as frustrated with you as they would if you didn't avoid the very visible red circle of death under your feet.
  • Don't be afraid to skip Events if you really need to get somewhere else, or if you just seem to be running into events everywhere you go to the point where it's obnoxious. That's happened to me before, and sometimes it's a bit more productive to just continue on rather than be aggravated by doing the same event over and over again.
  • Don't feel pressured into playing all the game modes. So long as you find one that you like, then it's good!
  • Don't sell non-junk items to NPCs. So long as it is not soulbound, it an probably be salvaged, crafted with, or sold on the Black Lion Trading Company.
  • Don't forget that Utilities/Heals/Elites are not permanently decided. You can swap them out whenever you need to, so long as you are out of combat. Almost all of them are completely situational, and what works for one fight won't work for another. Look at your class guides/forums to check on things like this.
  • Don't bother eating Food to get the Nourishment buff if you know you aren't going to be actively killing enemies / completing hearts. If you know you're going to spend 30 minutes crafting or doing map completion, you should probably save it because the experience buff only applies to kills.
  • Don't feel like you have to be perfect at your class from the very beginning, especially in PvE situations. You have 80 levels to perfect your technique, plus some time to adjust to dungeon. In general, don't join dungeon groups looking for a speedrun, join ones that are listed as "anyone welcome," or things like that, and once in, let them know that you are new. Most people will help you along and show you the ropes. You will, of course, run into some jerks who will kick you because of it, but don't take it personally. There are tons of nice people on the game who will help you. If nothing else, ask around in guild.
  • On the topic of guilds, don't forget that you can join multiple guilds at once. You can only represent one at once, but you can join quite a few. Guilds are also account-wide, so if you join a guild with one character, all of your other characters are automatically members as well. Guilds can be found for nearly any interest, and there are even race or class specific guilds to be found as well. Finding a class specific guild for the class of your choice may be handy because people there will definitely help you out, and will be more willing to teach you how to master that particular class.
  • Don't forget that one character can technically learn all crafting skills, if that's the way you'd like to go. Only two crafting skills can be active at once, but you can deactivate them at any time and keep all of your progress in the craft.
  • Don't go after anything labelled "Champion," or "Elite," on your own. You will die. Things labelled "Veteran," can be okay if you're decent at your class. Or a Mesmer with Scepter + Sword so you can spam Illusions out that hold aggro for you.
  • Don't be afraid to make multiple characters to try out the classes. I recommend getting to level 10 and definitely messing around in the PvP lobby with traits, skills, weapons, utilities, and the training dummies and such before making a decision. Look up builds. Do your research. You might find that you hate the Meta build, but love one of the more obscure ones. Or, you may find that you just can't stand the class, and that's okay too. I know I can't stand Thieves. I've tried a bunch of builds, but I can't get into it. Same goes for Engineers, to some extent. I think I would really like Elixir Gun Engineer, but I don't know if I can bear the leveling process to get to the Elixir Gun.
  • Don't worry about sticking with a specific build while leveling. Builds really only matter in organized environments like dungeons, PvP, and WvW. No one cares what build you use when you're playing by yourself. While leveling, do what feels comfortable and simple to you. As an example, many Necromancers use raised minions to level up, but switch to a different build at higher levels, although some will stay with a minion-based build. That said, at around level 40 or so you may want to consider at least switching over to the weapons for your chosen build so you can get used to the rotation, and then slowly faze in the Utilities and such as you gain the Talents to support them.

I hope this was useful to someone. Just got the idea while leveling today and felt like I had to write it out. And even if no one finds it helpful, it was worth it for me because I found it fun to write. So that's something, right?

Thursday, January 29, 2015

GW2 Characters for now

 Just some screenshots and build concepts. I don't like to follow builds I find online to the letter because it feels like there is so much room for creativity, and I don't plan on being a serious dungeon-goer anyway.
This is Keiana Xiphium, my level 34 Mesmer. I love her. Using Scepter/Sword and Staff.  I was initially looking at a build of 5/0/2/3/4 because I wanted a focus on Shatters, but as I level I am finding myself not Shattering much at all, and I'm finding that Glamours are my one true love for Mesmer mechanics. So I'll probably rework the build to have a higher focus on support and Glamour-spamming. Glamours = love. She's a Member of the Vigil because I like the Vigil light armor.

This is Seiga Nyan Nyan my Necromancer that I made on a whim when I realized that Seiga Kaku is a Necromancer, but the name Seiga Kaku was already taken, so I have Seiga Nyan Nyan instead. Need to save up for a customization kit so I can make her hair blue because she looks dumb with black hair. Looking at a build of 5/0/0/6/3 and weaponsets of Dagger/Dagger and Axe/Warhorn. I want to focus on condition mitigation and attrition. I don't know if that's a good idea or not. Just toying with the idea because from what I understand, Necros aren't very welcome into dungeon groups anyway, so why not? Besides, I'm sick of Staff Necro because I've played it for too long and I'm really enjoying Axe right now for whatever reason. Planning on having her join the Durmand Priory.

This is Tansy Thyme, my Ranger. I love her. I've never tried the Gourd-hair before, but I love it. Thinking of a build of 6/0/4/0/4 with weaponsets of Long Bow and Sword/Warhorn. Focus on just straight damage, I think. Going to have her join the Order of Whispers because I like the chestpiece.

This is Delphinium Bluebell, my Guardian. I love Torch for Guardians, so I'm going with that. More specifically, Greatsword and Mace/Torch. Thinking of a build of 4/0/4/4/2. Focus on support, I think. I'm going to have her join the Vigil because the heavy armor for Vigil is amazing.

And finally, this is Lhalla, my Elementalist. I really like the Elementalist Glyphs, so I'm focusing on those. Looking at a build of 6/4/0/0/4. Elementalist Talents confuse me immensely. Going to have her join the Durmand Priory.

Wednesday, January 28, 2015

Yes, yes, I'm playing Guild Wars 2

I know I know, I was into WoW two days ago. Things change, okay? :P

Things like a GW2 expansion being announced, that is.

So, here's my character:

This is Keiana Xiphium, my level 33 Mesmer. I kind of love her, although I wouldn't mind buying a re-customization thing because I'm not 100% fond of my eye-color choice.

Using a Scepter/Sword and Staff combination. Utilities are Signet of Inspiration, Null Field, Feedback, and Time Warp (although I'm saving up skill points for Take Root because Time Warp is not all that useful to me at this time.

Have my build somewhat planned, but not really. Can't decide between a focus on Shattering or on Glamours, or support and condition damage, for that matter. Initially I was planning on a Shatter build, but I ended up not really shattering all that much, and I've been using Glamours a lot, which I wasn't expecting.

May I just say that Mesmers feel amazing in group scenarios though? For example, large-scale Even if I myself am not doing too much damage, it just looks pretty great to put down a big Glamour and it feels impressive, even if it isn't. I also feel like I have a ton of survivability. The only times that I've died (aside from falling off cliffs, that is), was against that Champion Toxic Alchemist. I've gotten downed, of course, but that was really the only time that I died.

I can solo Veterans out on the field by putting up Phantasmal Swordsman and then spamming 1 to get two more clones out, and then then hold agro for me while I keep spamming 1 to keep up a constant supply of clones. If I'm getting attacked, I have two counters (Illusionary Counter and llusionary Riposte). I can warp to safety with Phase Retreat, give myself boons with Chaos Armor and Chaos Storm, remove enemy boons with Null Field, and avoid ranged damage with Feedback. All the while stacking Confusion, Torment, Bleeding, Burning, and Vulnerability with my attacks. Feels great.

Best thing just happened

I was playing GW2 on my new Mesmer (level 29 now), and I just experienced something really cool.

I ran into an event where you have to kill a Champion Toxic Alchemist in Kessex Hills (near Tagotl Grounds). At first, there were only three of us there and we were dying constantly. But we kept on trying and eventually took off a quarter of her HP before dying again and she reset. Slowly but surely, more people arrived but we still kept on dying.

But then we discovered teamwork and dodging.

Initially, everyone was just sort of rushing in, ignoring the adds and just attacking the Champion. We would then all run if everyone else got downed, and, of course, no one was dodging away from the exploding plants.

But after enough people arrived and we had died so many times, I think we were all set on beating it, so we figured it out. Instead of running away, we would run to other people and help them up, prioritizing people who were downed. Once everyone was up, we would resurrect the dead players. We killed the small adds, and some of us kited the veterans while everyone else focused on the champion and/or helping up other players.

It was really something to see, I think. Up until now, I had never seen proper teamwork in the game, only people who happened to be doing the same thing. But this was actually teamwork, in a way I've never encountered in an MMO outside of dungeons (and even then, that's more collaborating and less teamwork).

So, I was really impressed and happy.

And if anyone who was there happens to see this, I was the little blue Sylvari wearing yellow. I also think I was the only Mesmer there. Name was Keiana Xiphium.

Thursday, January 22, 2015

It's not too late for a New Year Resolution, is it?

My New Year resolution (albeit a very late one) is that I want to focus on my characters in MMOs more. Not like, spend more time leveling them or anything silly like that, but I want to focus on specific characters. I don't want to be all over the place like I always am. If I'm playing DCUO this month, I want to be focused on my Electricity Healer. If I'm playing FFXIV (which I will as soon as the expansion comes out!), I want to focus on my eventual Scholar.

And if I'm playing WoW? Well, I think I've found a character that I like, and I am going to force myself to stick to her. If you see any posts on here about any other WoW characters, feel free to write me an angry comment. I won't mind. I want to stick with it. I've been doing research all day about what classes do what, specifically, and I want to keep this one.

So, introducing my Shaman, Gensokyo, on the Ysera server:

That picture is not good. Too zoomed out.

Regardless! I picked a Shaman because, quite honestly, I am never going to play a Tank, but I am entirely likely to play a DPS or Healer at any given point. Unlike with Priest where I had one leftover spec that I had no interest in (I like Shadow/Disc), I have equal interest in Enhance/Ele/Resto, so I won't feel like I have one spec I don't care about. Going to start simple and go Ele first since I heard Enhancement has a bit of a learning curve and I want to take it easy for a bit.

As inspiration, I have my Lil' Tarecgosa pet that I bought from the guild shop thing, and a transmog I made in MogIt. Reason being: I love Dragonwrath, Tarecgosa's Rest and I really, really want to get it someday. Even if it can't be transmogged (It can't, right?), I love it, and the pet is pretty. As for the transmog...well, I think it looks pretty nice! It's got the chestpiece that you see pretty much everywhere, but I don't think I've ever seen it paired with that skirt. Not sure on the staff, just kind of put it there just because. I want something bigger and clunkier looking, I think. I had originally made this transmog for a Hunter with a big giant bow, and I want that same effect but for a Shaman.

Wednesday, January 21, 2015

More WoW Ideas

I've got all my characters created and I'm very happy with all of them. Need to visit the barber to fix a couple things (like Seigakaku and Yamaxanadu looking almost identical...), but other than that, I feel great about them!

Here's my plan:

Nazrin - Subtlety/Combat Rogue - Mining/Engineering
Kaenbyou - Balace/Feral Druid - Skinning/Leatherworking
Gensokyo - Marksman/Survival Hunter - Skinning/Herbalism
Kanakoyasaka - Elemental/Restoration Shaman - Herbalism/Mining
Shoutoramaru - Arcane/Fire Mage - Mining/Jewelcrafting
Toyosatomimi - Shadow/Discipline Priest - Tailoring/Enchanting
Saigyouji - Frost/Unholy Death Knight - Mining/Herbalism
Momizi - Fury/Arms Warrior - Mining/Blacksmithing
Seigakaku - Affliction/Destruction Warlock - Herbalism/Mining
Ibarakikasen - Windwalker/Mistweaver Monk - Herbalism/Inscription
Yamaxanadu - Retribution/Holy Mining/Herbalism

Got all my profession bases covered, plus some extra skinning, and plenty of extra herbs/ore.

Not certain yet on specs. Aside from the ones listed first because I'm pretty much set on those, with the exception of the Hunter and Warrior, since I'm not sure which one I want there.

Reasoning behind each character:

Nazrin as a Rogue because she steals things. I just wish the Commander title wasn't PvP-specific because Commander Nazrin would be amazing.
Kaenbyou as a Druid because Cat form. That said, I really like Balance Druids, so this is perhaps a silly one.
Gensokyo is a Hunter so I can name my pets after different characters. Also, I just made the most amazing set on MogIt and it happens to be for this character.
Kanakoyasaka as a Shaman because elements. She'd probably be better as Enhancement, but oh well, I like Elemental.
Shoutoramaru as a Mage because I was originally going to make a Paladin but then I decided I wanted Yamaxanadu to be a Paladin, so they switched and now Shoutoramaru is a Mage. Most important thing is the Jewelcrafting though.
Toyosatomimi as a Shadow Priest because I want to.
Saigyouji as a Death Knight because on another server I have a DK named Yuyuko, but it was taken, so this one is Saigyouji.
Momizi as a Warrior because it makes sense.
Seigakaku as a Warlock because it makes sense.
Ibarakikasen as a Monk because mist, and because Monks remind me of Touhou Hermits.
Yamaxanadu as a Paladin because Judgment is the name of a skill. That is the only reason.

I'll probably post what I've done in MogIt, since it's kind of good inspiration for me.

Solved my WoW problem + PDP Guide Status Update

I fixed my WoW issue. Decided to play on a non-RP server because social interaction was stressing me out. And I don't want to go back to Tanaris-Greymane because my dad plays on those servers, and he doesn't let me talk to anyone / gets mad at me if I talk to anyone. I'm 20 years old! It's time to move out of the old server and find my own!

So, I've moved to Ysera. Time to populate with characters. I think the server thinks I'm spamming character for no reason at all because it now disconnects me whenever I try to create a new one. Oh well, I have all but a Hunter, Monk, and Warlock on the server now.

I do believe I have found a server that has a Touhou-loving population? The names Toramaru, Yuyuko, Byakuren, Hijiri, Momiji, Satori, and Koishi were all taken. So sad that Toramaru is taken. I love Shou.

But! I am the proud owner of the names Gensokyo, Shoutiger, Toyosatomimi, Nazrin, Saigyouji, Momizi, Kaenbyou, and Yamaxanadu, Kanakoyasaka, Seigakaku, and Ibaraki. Which is very nice indeed.

Now to actually level them...Which one to start with...

GUIDE STATUS UPDATE

I will be waiting for the English patch to be complete before going back to formally revise the guide and do the end-game stuff. I want to be certain that my information is correct regarding items, trainer types, etc.

Monday, January 19, 2015

Need help making a WoW decision

I'm thinking about getting back into WoW, but I want to go on a RP server. I already have one picked out (Earthen Ring).
I just need to create my character.

I know I want to make a Shadow Priest because I have difficulty focusing on any other class.

I'm having trouble narrowing down a race, however. I've narrowed it down to two.

A Forsaken whose mind kind of snapped after being resurrected. She is a devout follower of the Cult of Forgotten Shadow and has an inexplicable fear of other races. She tends to be rather cheerful and friendly towards other Forsaken, and does not appear to remember being Human once at all.

My second idea is less fleshed-out (heehee), aside from "crazy Draenei Shadow Priest." I know the only way I can make it work is by having her be pretty much insane, because I can't think of any other way.

I really like the idea of my Forsaken, but I really don't like playing a Forsaken, which is a problem. They creep me out. I really like playing Draenei, but I don't feel like I could work with the same concept, and I don't really have any ideas aside from "insane."

I'll probably end up going with the Forsaken unless I can think of something good for the Draenei, but writing things down often helps me think, and who knows? Maybe someone has a good idea!

PDP Guide Part 22: Post-Game

Part 21 can be found here.

Upon the credits ending, you will wake up in the bed in Hakurei Shrine. You will speak with Marisa, who will lead you to a room to speak with Sanae and Reimu.
Sanae will bring you outside.

First of all, save your game. You've earned it.

So, what is there to do?
Well, honestly, I'm not sure yet because I didn't think I'd get this far.

I know the Reincarnation System is a thing though! I'm not going to bother writing a guide for it because a perfectly good one already exists: http://thpp.supersanctuary.net/forum/index.php?PHPSESSID=c7e5be12244c24ae26af2fd843abe511&topic=374.0

To give a quick summary of that:
  • The Reincarnation System basically lets you reset IVs, stats, Style, for any Puppet along with putting them back at level 1 (which means, no, you don't want to reincarnate your good Puppets yet. Go catch more and reincarnate those to be perfect and level them).
  • You can access Reincarnation by returning to Patchouli in Scarlet Devil Mansion. Well, not exactly Patchouli. Near where the Akyuu was there's now a little mini Patchouli. The Yin Yang Orb next to her is all the Reincarnation items. The mini Patchouli itself lets you reincarnate.
  • You can change the Nature of your Puppet through Reincarnation. Red = Focus Attack, Blue = Focus Defense, Black = Spread Attack, White = Spread Defense, Green = Speed.
  • Magic Stones can be used to mess with IVs. Basically, when you reincarnate you have the Puppet that is being reincarnated, plus two "parents" from which IVs are inherited. For more details on what each Magic Stone does, check the link.
  • The Rainbow Magic Stone is obtained through a questline that Kasen gives you.
  • Reincarnation costs Magical Fragments.

That said, you probably aren't going to get much use out of the Reincarnation System until you collect all the Magic Stones. So, to begin that, head on over to that healing spot near Mayohiga / Youkai Mountain Descent. Head left out of the rest stop area, up the first set of steps, and then keep going left. This is a path that we have yet to explore, and it is also the way to Kasen.

If you make your way through there, you will eventually get to Kasen. From there, the guide I linked above will take care of you. According to that guide, the rest of the Magic Stones can be obtained in the cave in the middle of Mist Lake, which I will go over eventually.

The rest of this I will update as  I find things to do. Major battles and such. I just want to get this part up, and then I'll update. The thing to know though is go visit Kasen before you do anything else, because she apparently unlocks the other stuff.

  • Shinmyoumaru Sukuna can be fought at Hakurei Shrine, in the room with the Akyuu and Bed. She's found over near a dresser, disguised as a weird decorative box-like thing. She uses a level 82 Suika, level 80 Benben, level 80 Yatsuhashi. level 82 Seija, and a level 84 Sukuna. Afterwards, Reimu will come in and kick her out.
  • Shou Toramaru will fight you back at Myouren Temple. She uses a level 82 Kyouko, level 82 Nazrin, level 82 Murasa, level 82 Ichirin, and a level 84 Shou.

Friday, January 16, 2015

PDP Guide Part 21: Makai

Part 20 can be found here.

Well, welcome to Makai. This is the final area of the main game (not including post-game, of course). In other words, this is pretty much the toughest challenge you are going to face. I hope you're ready for it.

As a terribly underleveled benchmark, here is my team for this:
Speed Momiji level 97
Power Lily level 82
Power Shou level 70
Power Koishi level 69
Power Iku level 67
Power Kanako level 67

Let's hope this is enough to complete Makai, shall we?

Upon exiting the weird white room, head down and you'll see that you're in a rather nice town (albeit a little strange. I never played the PC98 games, but why are there signs with random words on them?

Anyway, head up past the fountain and to the left. You'll see a Stall with a Demon Shopkeeper. She'll sell you healing items such as Paste of the Fog, Ecstasy Sets, Moriya Sinshu, etc. Head right past her and up. There's some grass here where you can capture Yumeko, Alice, Sara, Shinki, Yuki, and I'm assuming that since Yuki is here then Mai is too, and I just haven't run into her yet. [Thank you to anonymous commenter for letting me know Shinki can be caught here]
More importantly, however, keep heading up, up some stairs, and then right. Talk to Luize/Louise (I never know what the proper spelling is for her?), and she will heal you. Thank goodness. I love you Luize. I don't know anything about you, including how to spell your name, but I love you.
If you head back down to where the grass was and go right there is another Demon Merchant Kiosk-ey thing, this one selling Skill Card and Oath Thread.

When you're ready, head up the stairs near Luize/Louise. This will bring you to an area with a LOT of stairs. Which if I'm not mistaken is Pandaemonium? Or perhaps not. It's not all crystally, and I thought Pandaemonium was crystally?

Oh well, either way, go in and talk to the woman at the counter to gain access to the door on the left. Head on in. Oh, but first, need I remind you to stock up on supplies, heal, and save? Because I really shouldn't need to remind you.

Oh, and standard Elite Four procedures of save and heal after every fight applies. You can always Gap out if you need to. Just remember that Gapping means restarting your challenge against these guys. Even if you do get knocked out, you don't lose any money in this game, and you still gained Exp from fighting them.

First up, Yuki! She uses a level 68 Orin, level 68 Futo, level 70 Suika, level 70 Marisa (with an ability that lets her steal Held Items. She took my Food Rations TT_TT), and a level 72 Yuki.

Second, we have Mai! She uses a level 70 Patchouli, level 72 Satori, level 72 Iku, level 70 Seiga, and a level 74 Mai.

Third, we have Yumeko! She uses a level 72 Miko, level 72 Yumemi, level 74 Sakuya, level 74 Kokoro, and a level 76 Yumeko.

Finally, we have Shinki (who if I knew was next I would have fully healed my entire party rather than just keeping Kanako at half health because she's my sacrifice if I need to revive someone, and I would have unlearned/relearned Momiji's moves).

Well, here we go. Final boss. Shinki uses a level 76, level 78 Mima, level 76 Byakuren, level 78 Yumeko, level 80 Sariel, and a level 85 Shinki.

If you have defeated Shinki, then congratulations, you just completed a feat to be proud of. You know who else has level 80s? Red from Pokémon HeartGold and SoulSilver. So yeah, you just basically beat him, in case you never have before. I know I haven't.

Okay, so! After defeating her, you will get to talk to Yukari once more. Watch the credits roll, and wallow in your achievement.

I'll see you in the next part to begin the post-game!

PDP Guide Part 20: Heading to Makai

Part 19 can be found here.

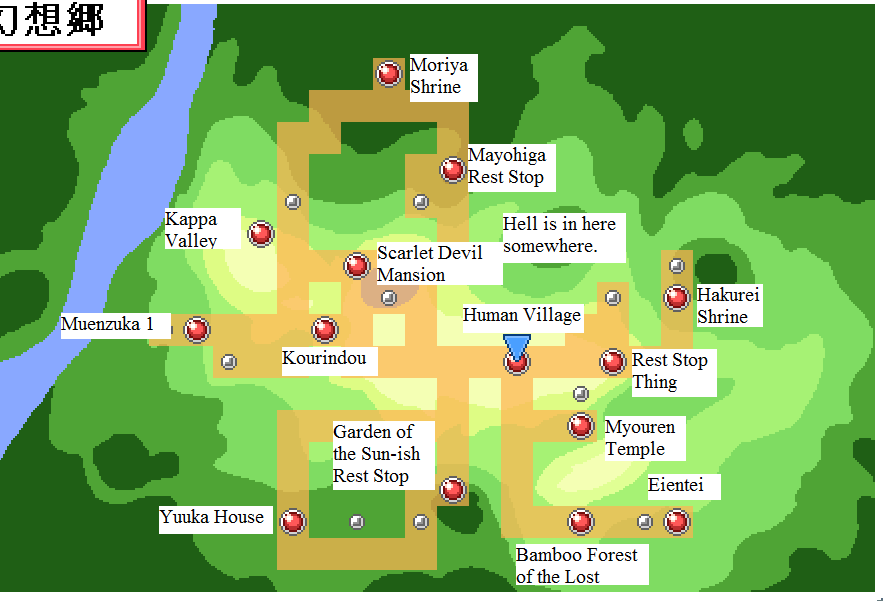
When you're ready, Gap on over to the Hakurei Shrine. Remember that there is a place to heal in the building you are Gapped to. Please be prepared for what you are about to face, because there is a bit of a difficulty spike here. If you have not yet had you entire team knocked out, this may be the time when you will experience it. That reminds me: That healing spot over by the Garden of the Sun sells Myouren Tea and Paste of the Fog. You know, just saying. These next fights are going to exploit weaknesses you never realized / remembered that you had. And it's going to hurt.

 Head right until the second place to turn up, then go up. Basically, you're heading to where you ran into Marisa for the first time. As you go down that path, you will be stopped by Marisa, who will fight you with a level 60 Nitori, level 62 Alice, level 62 Patchouli, and a level 67 Marisa.
After defeating her, she will run off. You should also run off and heal, because I can almost guarantee that you need it, unless you are very, very well prepared. My Momiji is level 89 and was knocked out in that fight with ease. Save after every fight as well, just in case.

Keep heading up and you will notice that the Giant Suika is no longer blocking your path, allowing you to continue. Head up and to the right first. Keep going to pick up a Yin Yang Orb containing Skill Card 33.  Now head back and this time go left. Save. Heal if you didn't before. Oh, and in the grass here you can capture your own personal Reimu. And Shingyoku.

Continue up where you will have to fight Reimu. She uses a level 60 Aya, level 62 Yukari, level 62 Suika, and a level 67 Reimu. I. Hate. Reimu's. Life Charm.

Past Reimu, you will see a very large tree. I honestly don't know what this is, but regardless, continue to the left! When you get to some steps, go up two sets, and then go right and up to pick up a Yin Yang Orb containing Skill Card 36. Then go back and head up the rest of the steps. You will now find yourself faced with a cave. But first, head to the left and down to pick up a Yin Yang Orb containing a much appreciated Hakurei Shinshu. Before you go in the cave, make sure you're ready to go. Have plenty of Moriya Sinshu, Paste of the Fog, and Oath Thread? Mentally ready to go? Okay.

In this cave, you can capture Ellis, Marisa, Reimu, Sara, and Byakuren. I am going for completion for this cave, and the easiest way to do that is to lead you through each route, then Gap out, heal, and head down the next path. It's much more painless than it sounds, I swear. It also has the added benefit of not using up all your BP before you get out of the cave. Also, I don't really know where I'm going, so doing multiple runs through is helpful.
In the cave, head up. Go up the stairs and keep going up and then cross the bridge. Then another bridge. Then go down some steps. Then turn left and pick up a Yin Yang Orb containing an Ecstasy Set. Head down the steps. Fight the Hooded Girl with a level 60 Flandre. Then head down the nearby ladder.
Head up and pick up a Yin Yang Orb containing Skill Card 46. Head down and to the left and fight a Ghost with a level 60 Mima. Continue past her and head up the nearby ladder.
Go down the steps and fight the Zombie Fairy with FIVE level 56 Yoshikas and a level 56 Seiga.
Continue down past her and fight a Brown-Haired Fairy with a level 58 Rika and a level 58 Shingyoku. Head up the steps near her and fight the Vengeful Spirit with a level 60 Yuyuko. Head up past the Spirit and fight a Ghost with a level 60 Eiki. Past the Ghost, you will find Skill Card 21. This concludes Path 1. Gap out, heal, and return to the cave.

Once again, head up until you reach a set of steps. This time, go left. Fight the Vengeful Spirit up here with a level 60 Mima. Apparently this Spirit is all that is over here...SO go back and head right this time.  Fight the Black-Haired Girl with a level 57 Seiga, level 57 Futo, and a level 57 Miko. Continue up past her and fight another Black-Haired Girl, this one with a full team of six Puppets. She uses a level 56 Seija, level 56 Youmu, level 56 Sanae, level 56 Futo, level 56 Shou, and a level 56 Sakuya. Continue up past them and fight a Girl with a white hat who uses a level 56 Lyrica, level 56 Lunasa, level 56 Merlin, level 56 Yatsuhashi, level 56 Benben, and a level 56 Raiko.

Head up the steps near her and keep heading up until you fight a Zombie Fairy with a level 58 Futo and a level 58 Miko. Continue past her and across a bridge. Go down one set of stairs, and then turn left. Fight a Purple-Haired Fairy with a level 60 Sunny, level 60 Luna, and a level 60 Star. Keep going left past her (the path is linear here). You'll have to fight a Sunflower Fairy with a level 58 Komachi and a level 58 Eiki. Right past her is a Yin Yang Orb containing a Combat Handbook (which, in case you forgot, is an item that allows a Puppet to receive more Exp from battle when it is holding it; meaning you can now have two Puppets receiving bonus Exp).
Return to the Purple-Haired Fairy and go down the steps to her right. Head down and fight the Ghost with a level 60 Youmu. Up past him is a Yin Yang Orb containing another Fate Thread. Head up and go up the nearby ladder.

When you get the chance, turn to the left and fight the Brown-Haired Fairy with a level 60 Yuyuko. Past her is a Girl with a hat who uses a level 57 Ichirin, level 57 Shou, and a level 57 Byakuren. Head back to the Brown-Haired Fairy and then go down. Head up the steps and across the bridge, then continuing going down. Fight the Ghost here with a level 60 Seiga. Down past him, head to the left and down the steps. Fight the Oni Woman here with a level 57 Yuugi, level 57 Suika, and a level 57 Kasen. Then head back up the steps and to the right, across the bridge. Head down the steps and then down the nearby ladder. Head down and pick up a Yin Yang Orb containing a Yoke Charm.

Go back up the ladder, then back up the steps, across the bridge, up past the Ghost, cross the bridge, go down the steps, and then head all the way back up to the Brown-Haired Fairy. Go left past her and get on your Inflatable Raft in the water. Head down the nearby waterfall. At the bottom, head right and then land on the nearby bit of land. Fight the Hooded Girl with a level 58 Sakuya and a level 58 Remilia. Below her is a Yin Yang Orb containing Sun Fruit Jam. Hop back into the water and continue going down until you reach more land. Continue forward and fight the Vengeful Spirit with a level 60 Nue. Head down the ladder and fight the Animal-Ears Girl with a level 58 Mamizou and a level 58 Ran.

Head to the left and head to the land on the left. Go up the nearby stairs. Fight the Oni with a level 60 Konngara. Go past him and head up the first set of steps. Go up and then up the next set of steps. Turn right and fight the Rabbit with a level 58 Yorihime and a level 58 Toyohime.

At this point, you will likely be running out of BP for most of your moves. There is a relatively easy fix for that. Go and make a note of what Skills you are using, and then go into Edit and swap around your Skills. Then re-teach the ones that you want to know. That will reset the BP to full.

Anyway, continue to the right of the Rabbit and go up the ladder. Go left and up to pick up a Yin Yang Orb containing Skill Card 28. Head back to the ladder, and then go down (the path, not the ladder). Fight the Vengeful Spirit with a level 60 YuugenMagan. Past him, continue down the nearby steps and then go to the right. Head down and fight the Oni Woman with a level 60 Kasen. Go back up and hop into the water. Keep going until you reach the end of the river. Hop off to pick up the Yin Yang Orb containing Skill Card 60. Then head down and fight the Rabbit with a level 58 Kokoro and a level 58 Reisen. Go down and head up the nearby steps. Keep heading up until you see a ladder. Go down the ladder.

Head down and then right across a bridge. Head down and then up a ladder. Head down, go past some steps to the left. Pick up a Yin Yang Orb containing a Prismatic Candy. Head back to the steps and go up two sets of steps. Head left and across a bridge. Head down, fight an Oni with a level 57 Kasen, level 57 Yuugi, and a level 57 Suika. Right below him is the exit. Thank goodness.

Head left and you'll see two sets of steps. Head down first, and then to the left to pick up a Yin Yang Orb containing Skill Card 8. Head back up the steps, and then up the next set. Head right, down some steps, then go down and pick up a Yin Yang Orb containing a Magic Crystal. Go back up, and right, and...another...cave...I'm not mentally prepared for another cave right now...

Okay...well...here we go....

Head left and up, then up a nearby ladder. Head right and then down. Fight the Girl with a white hat on the left with a level 58 Koishi and a level 58 Kokoro. Continue to her left and up the nearby steps. Then head right and up more steps. Fight the Ghost with a level 60 YuugenMagan and then continue up and cross the bridge. Head to the right and fight the Sunflower Fairy with two level 58 Yuukas. Next up is a Zombie Fairy with a level 58 Orin and a level 58 Utsuho. Head down past them and then turn left and pick up a Yin Yang Orb containing a Houen Charm. Then go right and hop over the ledge. Head up and fight the Vengeful Spirit with a level 60 Yukari.

Keep heading up and when you get the chance turn right and pick up a Yin Yang Orb containing a Moriya Sinshu. Head left and go up the steps. Save here. Now head right, up the steps, and cross the bridge. Head down two sets of steps, go up, and then left. Here, you will run into Gengetsu and Mugetsu. They will now fight you as a team. They use a level 64 Remilia, level 64 Flandre, level 70 (yes, you read that correctly) Mugetsu, and a level 70 Gengetsu.

After defeating them, head through the door. Then go up, left, and up some more. Next up, a fight against Sara and her level 60 Elly, level 60 Meiling, and level 62 Sara. She will let you pass once she is defeated. Remember to save, heal, and unlearn/relearn moves as needed.

Head up onto the weird platform to reappear in a kind of creepy white room. Head down and through the door. Welcome to Makai.

Part 21 can be found here!

PDP Guide Part 19: Myouren Temple

Part 18 can be found here.

Okay, so, now we can go to Myouren Temple for real! Whoo! If you have not already gotten there and opened it up as a Gap point, please go back to the Optional guide for it to find all the trainer Puppets and all that good stuff. If you're already all set (or are perfectly confident that you can handle whatever low-level Puppets the trainers can throw at you, which I'm sure you can), then head on over.

Head on in to the Temple itself and you will find the formerly missing Byakuren. She will show you the locations of all her disciples (Kyouko, Murasa, Ichirin, Nazrin, and Shou), and I'm assuming you have to fight them all before you fight her, because that makes sense.

Due to the levels here, remember that it is really easy to Gap out to a healing spot and then Gap back. Don't bother wasting healing items here since it's so easily reachable. You won't have to reface anyone or anything like that.

So first off, head out of the Temple and straight down to the entrance of the area itself and beat up Kyouko and her level 50 Kogasa, level 50 Mystia, and a level 50 Kyouko. Now, head up and to the right a bit until you end up near the water. Here, you will have to fight Murasa and her level 53 Nue (it will look like a Murasa when you fight it) and level 53 Murasa (this one is actually a Murasa, not a Nue). Also, cross the water next to her to pick up a Yin Yang Orb containing Skill Card 32.

From Murasa, head up the steps and to the right to fight Ichirin and her level 56 Ichirin. Now head up the next set of stairs and go left until you see Shou (Yay!). Shou will fight you with a level 50 Kyouko, level 52 Nazrin, and a level 54 Shou.

Shou is my favorite character so I couldn't resist, sorry (well, that and she killed my Momiji...).
After defeating Shou, head up the stairs next to her and into the Graveyard. Head up and hug the left wall. Head up the steps, and you'll see Nazrin right in front of you. She will fight you with a level 52 Shou and a level 52 Nazrin. I think it's important to note that her Shou knows a move which will switch her out for Nazrin. Just something to remember, in case she hits first.

After defeating Nazrin I'm going to advise Gapping out to heal and then returning. Oh! And save! When you return, head into the Temple and talk to Byakuren. She will fight you with a level 60 Ichirin, level 60 Nue (disguised as a level 65 Byakuren), level 60 Shou, and a level 65 Byakuren. I'm going to warn you right now that Byakuren hits hard and fast. She pretty much annihilated my Momiji, Lily, and Shou, and I had to use my only Hakurei Sinshu to bring Momiji back.

When you're done, Gap on out to heal.

I know that this was short, but I felt it deserved its own section. So, on to Part 20!

Part 20 can be found here!

PDP Guide Part 18: Garden of the Sun

Part 17 can be found here.

Okay, so, when you're ready, head on into that cave! In here, you can capture Yamame, Kisume, Sara, and Koishi. [Thank you to Afrien the Nerd for telling me Koishi can be found here]

Start by heading up, and then up the nearby stairs to pick up a Yin Yang Orb containing Myouren Tea. Head back down the steps and then to the right. Head up and fight the Animal-Ears Girl with a level 47 Ran. Head up past her until you see more steps. Ignore them (there's nothing up there) and instead go left. Keep going left-up-ish until you see a Brown-Haired Fairy who will fight you with three level 44 Rumias. To the left of her is a Yin Yang Orb containing a Prismatic Candy. Now head to the right of her and down the ladder there.

Head directly down and fight the Ghost with a level 47 Youmu. Head left past him, ignoring the stairs for now, until you get to a Yin Yang Orb containing Skill Card 48. Head back to the Ghost and this time go down and pick up a Yin Yang Orb containing a Gold Coin. Now go up and head up those steps. Head right and cross the bridge. Fight the Girl with a white hat to your right. She uses a level  45 Benben and a level 45 Kogasa. Continue past her down the steps, then head left and down another set of steps. Continue down and fight a Ghost with a level 47 Tojiko. Head left past her and up some steps, then down some more steps to your left. Head down and you'll see some water. Head down and right from there to pick up a Yin Yang Orb containing a Silver Coin. Now head up and to the left.
Fight a Purple-Haired Fairy up here with two level 44 Lunas and a level 44 Cirno. Head up past her to reach a ladder, which you should go up.

Head down and across a long bridge. Head left of the bridge and pick up a Yin Yang Orb containing Sun Fruit Jam, and then head out the nearby door.

Immediately outside the entrance is a Sunflower Fairy who will heal you when you speak with her. Below her is a Purple-Haired Fairy with a level 44 Lily, level 44 Sunny, and a level 44 Star. To the left of her is a Hooded Girl with a level 45 Remilia and a level 45 Flandre. Past her is a Girl with a hat who uses a level 45 Kisume and a level 45 Nitori.
The grass here contains Orange, Elly, Kurumi, Gengetsu, and Mugetsu.

Continue forward and fight a Black-Haired Girl with a level 45 Elly and a level 45 Kurumi. Continue forward past an Animal-Ears Girl (she won't fight you) and then up into a new area.

Okay, now we're in the Garden of the Sun! I knew it was next! Anyway, head to the right first and up some steps until you get to a small grassy patch with a Yin Yang Orb containing an Oath Thread. In the grass here you can also find Wriggle, Lunasa, Merlin, Lyrica, and Yuuka. Now head back and go left. You'll see a Yin Yang Orb to your left that you need to make your way over to. When you get to a crossroads-esque thing, go left and then down. Cross the water to pick up the Yin Yang Orb, which contains Skill Card 19. Head back to the Crossroads and go up. Fight the Sunflower Fairy with a level 49 Eiki. Head right (from below her, not above) and fight the Purple-Haired Fairy with a level 49 Lily.
Head up past her and you'll see a small space between Sunflowers and the wall that you can slip into to the left. Head through there and make your way around into the grass to pick up a Yin Yang Orb containing Sun Fruit Jam. Head back out and go through the path that is to the right and just a bit above the Fairy.  Then head up and go up the steps. Head left, up more steps, left again, down one more set of steps and fight a Sunflower Fairy using a level 49 Komachi. Head up past her and pick up a Yin Yang Orb containing Skill Card 75.
Now head back to that Purple-Haired Fairy. Again, go through the path right above her and to the right. Go up, and instead of going up the steps, this time keep going right. When you get to an area with a few different turns, go down a bit and fight a Sunflower Fairy with a level 49 Medicine. Now head up and go through the grassy. Keep going up and fight another Sunflower Fairy, this one with a level 46 Yuuka, level 46 Komachi, and a level 46 Aya.

Head a little bit down and to the left. Go down and fight a Brown-Haired Fairy with a level 47 Wriggle and a level 47 Rumia. Now head up and right. You'll come to a grassy area leading up. Head up there if you like to fight a Purple-Haired Fairy with a level 47 Cirno and a level 47 Luna.

Head back down and then left. Fight the Sunflower Fairy there with a level 47 Komachi and a level 47 Aya. Go up past her and then left and then down and fight a Brown-Haired Fairy with a level 49 Shizuha. Left of her is a Yin Yang Orb containing an Oath Thread. Head up and then right. Oh, but save first.
When you get to the end, go up, and you will be stopped by Yuuka.She will fight you with a level 58 Kurumi, level 58 Elly, and a level 62 Yuuka. After defeating her, head up. To the right is Yuuka's house, but there's not anything to do there yet, so just keep going up instead.

You will get to another area. It's rather linear. Fight the Sunflower Fairy in your way who uses a level 50 Yuuka. Once you reach the river, head left to find some grass which contains Sekibanki, Seija, Yatsuhashi, Benben, and Raiko. Head right to continue on in the area. You will come to yet another grass area, this one with a Purple-Haired Fairy in it that will fight you with a level 47 Star, level 47 Luna, and a level 47 Sunny. Continue up the stairs nearby and go to the right and up the next set of stairs. Go up and head up yet another set of steps. Keep going up and to the right to pick up a Yin Yang Orb containing a Silver Coin. Then head back down until you get back to the first set of steps. Now go up and continue forward. You'll have to fight a Brown-Haired Fairy with a level 48 Rika and a level 48 Orange.
Continuing forward and down a set of steps, there's some more grass to your left. In the middle is a Black-Haired Girl with a level 50 Letty. Now head down and to the left. Save and heal here, because you will have to fight Benben and Yatsuhashi up here.

First up is Benben, on the right. She uses a level 48 Yatsuhashi and a level 50 Benben. Secondly, on the left, is Yatsuhashi, who uses a level 48 Benben and a level 50 Yatsuhashi.

Continue on past them and you'll see an Old Man and a Fairy. The Old Man will fight you with a level 48 Iku and a level 48 Wakasagihime.The Fairy will not fight you. Continue forward and fight a Girl with a level 48 Ichirin and a level 48 Meiling. Past her is a Man with a level 48 Shizuha and a level 48 Minoriko. Just past him is a little spot where you can turn up into some grass. Do so and pick up the Yin Yang Orb up there that contains a Moriya Sinshu, then go back down and continue forward past the Sunflower Fairy to a Boy who will fight you with a level 48 Mystia and a level 48 Medicine.
Past him you will see a hoppable ledge. Head down there and go right to pick up a Yin Yang Orb containing Skill Card 24. Find a way back up and then head right. You'll have to fight a Man with a level 50 Keine. Past him is a whole other area.

Continue straight until you get to the end of the river and a ledge. Go into the river and move up to a grassy area to pick up a Yin Yang Orb containing Skill Card 53. Then head back down and hop the ledge. Go up from here and you will find yourself back at the road to the left of the Human Village. Heading directly right will bring you to the Human Village and a much-needed healing spot.

That is all for this part. I believe we are on to Myouren Temple next (for real this time!), but first I'm going to go update the Gap Map stuff.

Part 19 can be found here!

Tuesday, January 13, 2015

PDP Guide Part 17: Awkward Long Bit Between Garden of the Sun and Remains of Blazing Hell

Part 16 can be found here.

Restock on any items you need and Gap on over to the Human Village. Take the left route out as if you were going to Mist Lake or the Forest of Magic. However, do not go far into the route! As soon as you see the Old Man NPC, go down. This route is finally open!

Head down. In the grass here you can find Meira, Mamizou, Lily, Daiyousei, and Louise.
You will also notice that the wild Puppets are now 40+. As such, please stay here and grind if you still have any Puppets that are not yet level 40 (really at this point, the only things less than level 30 are either something that you went back and caught, or anything you caught in Hell. Everything else should be around 50 naturally at this point, most likely).
At this point, you should also probably be carrying around an ample supply of Chirei Buns and/or Paste of the Fog. If you don't have your main holding the Healing Charm then you should also probably carrying Myouren Tea with you.

As an added note, you will now start seeing some Puppets in the wild with already chosen Styles. Please be certain that you are capturing the one that you want!

Keep on heading straight and fight the Man who uses a Yuuka level 44.

Up a bit further, there is a Boy in a patch of grass with a level 42 Nue and a level 42 Seija. Past him is a Girl with a level 44 Ellen.

A bit further is another Boy, standing next to some steps. He won't fight you, but do go up the steps. Ignore the second set of steps and go around them, and then head up the last set of steps. Fight the Man here, he uses a level 42 Seiga and a level 42 Futo. He was guarding a Yin Yang Orb that contains a Paste of the Fog.

Head back down the steps to the Boy, and then continue right. You'll see a Black-Haired Girl here. Across from her is some grass. Head through there and go up. Fight the Pink-Haired Girl up here with a level 42 Nitori and a level 42 Wakasagihime. Directly next to her on the right, use your Inflatable Boat to get to the other side. Head through that grass and pick up the Yin Yang Orb containing a Floating Stone. Now head on back to that Black-Haired Girl, and start moving down, hopping the silly ledges if you like.

A girl with a hat will fight you down here with a level 44 Kokoro. Head up the three sets of steps near her, and then go up, fighting a Purple-Haired Fairy with a level 42 Star and a level 42 Cirno. Head to the left of her and then up. You'll find yourself faced with a choice of Left or Right. Head right first, through the grass, and pick up the Yin Yang Orb containing an Oath Thread. Now head left. Fight the Purple-Haired Fairy here with a level 42 Sunny and a level 42 Luna.

Head down the steps (two sets),and then turn right. Ignore the first set of steps and keep going. When you see the second set of steps (and two girls standing next to each other), go up and pick up a Yin Yang Orb containing a Champion's Medal. Now go back and fight the two girls. The one on the left uses a level 42 Satori and a level 42 Alice. The one on the right uses a level 44 Mamizou.

Head down past them (not down the steps yet!), and continue on. Ignore the steps that lead up, instead go down the other set of steps and pick up  Skill Card 26. Head back to those two girls and now go down those steps next to them.

Next is a rather simple maze (Okay, really simple). Fight the Brown-Haired Fairy here who uses a  level 41 Orange,  level 31 Tokiko, and a level 41 Rumia. Head up the steps at the end, then go up and fight the Sunflower Fairy who uses a level 44 Aya. Now, head down past her and finally down some steps. The last trainer before you reach a safe area is a Woman with a level 42 Youmu and a level 42 Sakuya.

The building here is a healing spot. There is also a merchant here, who will, of course, sell you Oath Thread and Magatama.

When you are ready, head downwards from the healing spot. This will bring you to a new area, where you can capture Eirin, Daiyousei, Medicine, and Reisen.

Head down and to the left first (don't jump off ledges yet). Head down and left into a flowery area, and fight the Purple-Haired Fairy there with a level 43 Luna and a level 43 Cirno. Slightly hidden in the flowers to her left is a Yin Yang Orb containing Wolfsbane Root.
Hop off the ledge directly below you and fight the next Purple-Haired Fairy with a level 45 Sunny. Head down and to the right to fight a Brown-Haired Fairy with a level 45 Wakasagihime. Go back up and to the left, jump off the nearby ledge into the grass and pick up a Yin Yang Orb containing Skill Card 77. Now head through the grass and to the right. Hop off the ledge there.

Now, head all the way back up past the first Purple-Haired Fairy in to the grassy area, and go right. Hop off the ledge on the far right. Fight the Brown-Haired Fairy here with a level 43 Rumia and a level 43 Letty. Hop off the next ledge and fight the Sunflower Fairy with a level 43 Eiki and a level 43 Komachi. Hop down the next ledge and pick up the Yin Yang Orb hidden in the flowers that contains a Magatama. Hop down the final ledge into the grass.

Continue downwards. Before you turn right, you should probably heal and save. Continue on, and you will see Medicine. You will have to fight her once you have spoken with her.
Medicine uses a level 53 Alice, level 55 Kokoro, level 53 Mokou, level 53 Hina, and a level 58 Medicine.
Now, I feel like I should warn you that she is kind of unexpectedly difficult, at least to me. All but two of my Puppets were fainted by the end.

Once she is defeated you can head up to the grassy bit and then hop off the ledge to your left. Continue downwards/left-ish to the next area. Or you can run/Gap back to that healing spot and heal first, which is what I highly advise!

Directly in front of you in this new area is a Brown-Haired Fairy using a level 47 Wriggle.
 In the grass here, you can capture Kurumi, Elly,
Continuing forward is a Sunflower Fairy who will not fight you, and a Rabbit directly next to her with a level 47 Reisen.

Continuing on, you'll see a spot where you can go right and either up or down. Go up first, fighting the Brown-Haired Fairy there with a level 47 Sara. Up past her is a grassy area with ledges. You can find Mugetsu and Gengetsu in the grass here. All the way to the left is a Yin Yang Orb containing a Paste of the Fog. Head back to the fairy and then go down. In the clearing here you will see a hooded girl who will not fight you, go to the left a bit to fight a Tengu with a level 45 Hina and a level 45 Momiji. [Thank you anonymous commenter for telling me that Mugetsu and Gengetsu can be caught here]

In this clearing there is also the entrance to a cave. This is also where I need to stop this part of the guide because it is lagging because of so much text. So, I'll see you in part 18!

Part 18 can be found here!

PDP Guide Part 16: Remains of Blazing Hell

Part 15 can be found here.

Welcome to the Remains of Blazing Hell. This is probably the most menacing area of the game, atmosphere-wise.

So, leave the Palace of the Earth Spirits through a dark, soundless hallway, and you'll be in a lava-filled area playing Hellfire Mantle. You can, of course, capture Utsuho here. Other Puppets include Kikuri and Konngara. [Thank you to Damian xi for letting me know Konngara can be found here]

Ok, so! Start by going straight! Also, this place is too confusing to go in-depth with right now, so let's go the simple route, shall we?

When you see a bridge, ignore it for now and instead go up, left, up, and head up the steps. There's a Zombie Fairy up there who will fight you with a level 41 Utsuho. Head back down the steps and go back to the bridge. Cross it and fight the Vengeful Spirit there with a level 41 Nue.

Head up past the Spirit and then down the steps. Head to the right and pick up the Yin Yang Orb containing a Rice Dumpling. Then head back and up. Fight the Vengeful Spirit with a level 41 Seija. Past him is a bridge. Cross it. You'll see a cat run away as you do. Head up the nearby steps, then down the next set. Fight the Vengeful Spirit with a level 41 Kikuri. From the spirit, head up, and down the ladder.

Fight the Vengeful Spirit with a level 41 Tojiko. Go right, and then up.  When you get to an area where you can turn, go right. You'll see the cat again. Follow it. Fight the Zombie Fairy with two level 39 Futos. Go down the steps near her, follow the path. Do not turn left, go up instead. Cross the bridge to the right and pick up the Yin Yang Orb containing a Prismatic Candy. Go back across the bridge and then up and left. Fight the Zombie Fairy with a level 41 Suika. Go to the left and down the ladder.

Go down and cross the bridge. Fight the Zombie Fairy with a level 39 Kisume and a level 39 Yamame. Go past her and turn left. Pick up the Yin Yang Orb that contains a Rice Dumpling, then go back and down. You'll see the cat again. Follow her downwards. Oh, and save. Now. Trust me.

Head up the steps and you will have to fight Utsuho herself.

She uses a level 42 Orin, level 42 Utsuho, and a level 46 Utsuho.

Ultimate battle, by the way.
Upon defeating her, go past Utsuho and take the steps up first. Go all the way to the end to pick up a Yin Yang Orb containing Burning Stones. Go back and down the steps, cross the bridge, and you can exit this area. Orin is over here too, but she won't fight you yet.

Go down the hallway. At the end, go through the top doorway first to heal in the bed there. Then take the bottom door.

Head down in this creepy area to be ambushed by Medicine, Wriggle, Mystia, Luna, and Sunny. Reimu will appear to help, and the rest will run off. Reimu will then leave too.

You can't go the way that she did, and there is nothing to the right, so your only choice is to go down.

Go right next and fight Luna Child and her team of level 40 Gyokuto, level 40 Kagerou, and level 40 Luna. Head down past her to face Sunny Milk and her team of level 40 Star, level 40 Luna, and level 40 Sunny. Head up and go up the nearby stairs to witness a fight between Reimu and Wriggle. Then head back down and fight Cirno and her team of level 41 Daiyousei and level 41 Cirno.

Next up is Rumia and her level 41 Sekibanki and level 41 Rumia.
After her, you will run into Reimu again. She will leave to the south. If you follow her, you will see her surrounded by fairies. You will then have to fight Medicine. Medicine uses a level 44 Rumia, level 44 Cirno, level 44 Sunny, and level 48 Medicine.
After defeating Medicine, I'm assuming Reimu is telling you to go on without her. While you could follow Medicine now, there's some other things to do here, so let's finish up here first, shall we?

Head down, and then keep going up until you see Mystia, and then turn left (you don't have to fight anyone over there because Reimu took care of it). Go past the steps and to the next platform, then go up and through the door. In here is a storage room of sorts with a bunch of Yin Yang Orbs. You can get a Paste of the Fog, Skill Card 25, Prismatic Candy, and Moriya Sinshu in here.

Now, head back to Reimu and go up.

In the next area, go left. Go up the steps, and then go left and up. On the next platform, it doesn't matter which way you go. Just go up. On the next platform, go right and up some steps. You will now have emerged near Mayohiga.

Now, you can either continue on here and walk to the little rest area near Mayohiga, or just Gap there. I'm going to walk for the extra Exp, but if you are in desperate need to healing, there is no shame in Gapping.

Head up the steps nearby and fight the nearby Sunflower Fairy with a level 32 Medicine and a level 32 Aya. Pick up the nearby Yin Yang Orb containing Skill Card 54. Head up and fight the Brown-Haired Fairy with a level 32 Kisume and a level 32 Yamame. Just past her is a Purple-Haired Fairy with a level 32 Sunny and a level 32 Star. Now head up the steps and get on your Inflatable Raft in the water. Head to the left and hop down the waterfall. Keep heading down waterfalls and to the left until you finally reach the end and can hop off (you'll see a road). You will be back near Mist Lake. Now, feel free to Gap wherever you like, or hop on down to Mist Lake and take it from there.

I'll see you in Part 17!

Part 17 can be found here!

PDP Guide Part 15: Palace of the Earth Spirits


Part 14 can be found here.

When you're ready to head on out, go to where the shop is in Former Hell and head up. Go up the three sets of steps and then straight. Head across the bridge and then right. This will bring you to a new area.

First is an Oni who will fight you with a level 37 Suika and level 37 Yuugi. The path is really linear here. Next is a Vengeful Spirit with a level 39 Tojiko. After that, a Female Oni with a level 39 Kasen. Then another Vengeful Spirit, also with a level 39 Tojiko. Then, you will at last have reached the Palace of the Earth Spirits.

First of all, in the lobby is a rather menacing bird. He doesn't appear to do anything, so just ignore him...

In the door to the right you can find a Yin Yang Orb containing a Prismatic Candy. To the far left is another door, this one with a Yin Yang Orb containing an Ecstasy Set. Up the stairs next to the scary bird is another door. Inside this one is Satori. Who will fight you.

I was honestly not expecting to find her so early, so she kind of scared me.

Anyway, she uses a level 45 Orin, level 45 Satori, level 45 Utsuho, and a level 45 Koishi. She will not heal you afterwards, which is sad because her Orin killed my Momiji :(

 Anyway, after you're done dealing with Satori, go back to the scary bird, and then go up. When you can, turn right and head up the stairs. There is a door with an empty room. If you go and try and rest in the bed you will be healed, but you will also be frightened by a surprise Koishi. You know, the floating objects and such in the Prismriver House didn't frighten me at all, but I keep jumping in here. First Satori scares me and then Koishi. They keep popping up where I don't expect them to!

To the left of this room is another door, which leads to a big round room. Go around the circle until you can turn left. Do so and enter the door there. In there is a Yin Yang Orb containing a Chirei Bun. Exit and keep going around the circle to pick up a Yin Yang Orb containing Oath Thread. Then return the way you came. Head back to the right, down the steps, and continue along the center path.  The door at the end will bring you to the central area of the big circular room. Go around the circle to the very center where the fountain is and pick up the Yin Yang Orb containing a Magic Ring.
In the grass here, you can capture Orin, Koishi, Satori, and Utsuho. When you are ready, you can exit the area through the top left. There's a door up there. Uh, you may want to heal and save first though, because the next area is rather menacing...

Part 16 can be found here!

PDP Guide Part 14: Reaching Former Hell

Part 13 can be found here.

So, remember that little healing spot in-between Hakurei Shrine and the Human Village?
Gap there.

Now, head a bit to the right and then up. You should see a little rock. Smash it and continue upwards. This will bring you to a new area. In the grass you can catch Kogasa, Yumemi, Chiyuri, Sekibanki, and Ruukoto.

There is an Old Man who will fight you with a level 36 Kasen. Past him is some grass and a girl with pink hair who fights you with two level 34 Hinas. The path continues to the right. You will have to fight a Purple-Haired Fairy up here with a level 36 Daiyousei.

Head up the stairs past her and fight the black-haired girl with a level 36 Parsee. Just past her are two Fairies who will not fight you, and then past them is the entrance to a cave. When you approach the entrance you will be attacked by a girl with a hood and her level 36 Chiyuri. An Anonymous Commenter states that "talking to the second rock to the left of that girl contains a Paste of the Fog." (Thank you anonymous commenter!)

Head on into the cave. In here, you can capture Parsee, Suika, and Kisume.

Head straight until you see some stairs. Head right instead of going up the steps first. All the way at the end of that area is a rock. Interact with the Rock to pick up some Gold Dust. Then head back to the stairs and go up them.

You will have to fight the Animal-Ears Girl here with her level 35 Orin and level 35 Kagerou. Proceed across the bridge after and down the steps. You'll eventually come across a ladder. Head on down.

On the next floor, it appears Yuugi joins the mix as a Sealable Puppet. At least, I never encountered her on floor 1, but she was my first encounter on floor 2.
Upon going down some steps you will be attacked by a girl with a hat and her level 37 Parsee. Below her is a Yin Yang Orb containing a Chirei Bun. Head down the nearby steps and up the ladder.

I think we are back on Floor 1, but a different area of it. Yuugi Puppets appear here too, so maybe they are Sealable on Floor 1?  As do Yamame. Head up the steps  and cross the bridges. At the end of the bridges you will have to fight a Vengeful Spirit with a level 37 Tojiko. Cross the next bridge and head down the steps. Don't go down the ladder yet though. Instead, go to the right. Follow the little path until you can turn left, then do so, and go pick up the Yin Yang Orb containing Gold Dust. Then head on back and go down that ladder.

Head down the steps and fight the hooded girl with a level 37 Koishi. Up past her, you can turn left to head up a ladder. The only thing up there is another Rock that if you interact with it you can pick up Gold Dust. If you want to do it, then it won't cost you much time at all. Head back down the ladder after.

Head up the steps and fight the Oni with a level 34 GIANT POWER SUIKA, level 34 Defense Suika, and a level 34 Kasen. Then head down the steps near him and down the ladder.

Head to the left and fight the Vengeful Spirit with a level 37 Tojiko. Then head down. When you can turn right, there is yet another Interactable Gold Dust Rock. Otherwise, head down. When you reach the end, turn right to pick up a Yin Yang Orb containing Skill Card 17. Then head left.

Down here, you will have to fight Kisume. She uses two level 37 Kisumes. Because she's creative.

Head down the ladder near her and head across the bridge. Keep heading on up. There is nothing to the right; not even a Gold Dust Rock. When you get to the top of the stairs, do turn right, however, and then down to pick up a Yin Yang Orb containing a Chirei Bun. Continue and pass by the stairs to fight a Vengeful Spirit with a level 37 Mima. That's a new one. Now head down the steps and through the cave.

Continue straight, down the steps, and then straight some more. Down more steps and straight.
You will have to fight a Female Oni with a level 35 Yuugi and a level 35 Suika (Note to self: Wind is very effective against Onis). Past her is a Pink-Haired Girl with a level 34 Chen, level 34 Tokiko, and level 34 Mystia.
A ways past her is a Vengeful Spirit using a level 37 Seija. Past him a ways is some steps up. Keep going to the right.

Allow me to warn you now that you are about to enter into a sort of tricky patch. You are likely running rather low on SP now, and you are about to do three boss fights in a row. Just warning you.

You will eventually come to a longer-than-usual bridge. Yamame will challenge you to a fight here. She uses a level 34 Wriggle,  level 34 Medicine, and a level 37 Yamame.

Down the steps past her pick up a Yin Yang Orb containing Skill Card 73, then continue forward and through the cave.

Now, you will come across a different-looking bridge, guarded by, of course, Parsee Mizuhashi, who will challenge you to a fight. She uses a level 36 Yamame and a level 36 Parsee.

Continue past her and you'll run into Yuugi, who will fight you with a level 36 Power Suika (giant), level 36 Kasen, and a level  37 Yuugi.

Continue past her and you will at last reach Former Hell, which means healing! Yes!
There is a Shop in the second row of buildings to the left, and a healing spot to the right. There are also quite a few items to be found around here if you do some exploring, including Skill Card 41!

So, with this, onto the next section!

Oh, but first, you may want to stick around here and level. If all of your Puppets are not level 45+ you may have some difficulties.

Part 15 can be found here!

PDP Guide: Map

This is only as much of the map as I have gotten to thus far, but I figure a partial map is better than no map, right?

Anyway, I do not know Japanese, so the names are more based on knowledge of Touhou place-names rather than direct translating. And I called things Rest Stops for lack of a better word on how to describe them. For example, the "Mayohiga Rest Stop" is right near Mayohiga, but it is not in Mayohiga. So I called them Rest Stops.

As I get more of the map filled in, I'll update this. For now, this map just keeps up with where I am in the guide.


This is a second map that can be accessed by pressing A or D on the normal Gap Map. It consists of all the areas in Hell, with the only Gap point being Former Hell.

PDP Guide Part 13: Prismriver House

Link to Part 12 can be found here.

Okay, so this part is possibly optional, but I'm not 100% certain that it isn't necessary later on, so I'm including it as part of the guide anyway. I know it isn't required to get to Former Hell which is where we are technically headed next, but this is an interesting side-area regardless, and it seems like it has relevance later or something, maybe. And Exp is good!

So, beginning from that little healing house near Mayohiga, head down. When you get to the up and down steps, go down. The path is linear until you get to another area where there are up and down steps. Keep going down.

You'll eventually run into a Kappa who uses a level 32 Murasa and a level 32 Nitori.
Keep going past him. There's a Brown-Haired Fairy looking at the water. If you talk to her she will fight you with a level 32 Wriggle and a level 32 Rumia. Just past her are some ledges which are kind of silly since you don't really need to jump over them. Regardless, you are heading down there, so jump the ledges or don't; it doesn't really matter. Head up the nearby stairs where you will find Hatate. Hatate will fight you with a level 34 Aya and a level 34 Hatate.
Below her you will find a Yin Yang Orb containing Skill Card 40.

Go back up past the ledges and then continue to the right. You'll see a Kappa and a Tengu standing near each other. They won't fight you, so keep going.
Keep on following the path and you will get to yet another area with up and down steps. Once again, keep going down. There's a Sunflower Fairy down there who will fight you with a level 32 Aya and a level 32 Komachi.

Keep going and you'll find yourself at...surprise! Mist Lake! Hop down the nearby ledges and make your way over near the water. There should be three people wandering around. Head down from there. Once you get past the grass patch, turn right and go across the bridge. When you see a Ghost, go down a bit more until you see a Brown-Haired Fairy. Then, turn right. Go through the grass and smash the rocks in front of you.

In these dark grassy spots you can capture Merlin, Lyrica, Lunasa, and Kana. Keep going through the grass until you find a run-down manor. Head on in. Once inside, go to the left and through the door there. Your character will look around. Exit the room and then re-enter to fight Merlin. She uses a level 34 Lyrica, level 34 Lunasa, and a level 35 Merlin. [Thank you to an anonymous commenter for letting me know that Kana can be captured in the grass here]

Now leave the room and head right. Enter the door there. You will see a floating chair. Exit the room and re-enter to fight Lunasa. She uses a level 34 Merlin, level 34 Lyrica, and a level 35 Lunasa (be warned, the Lunasa is in Defense style, so it can take quite a bit more damage than the others).

Now, exit that room and go up the stairs to the left. Go into the door straight ahead. You will see a thing break. Exit and re-enter to fight Lyrica. She uses a level 34 Lunasa (Defense again), level 34 Merlin, and a level 35 Lyrica.

Head out of that room and to the left. There's a door on the bottom (just looks like a little cut out in the wall, basically). Go in there to see a little floating piece of paper. I can't read Japanese, but I'm assuming it is a Thank You or something. Upon exiting and re-entering, the piece of paper is gone.

The last thing to do here is to leave the room and go all the way to the right and then up to pick up a Yin Yang Orb containing Skill Card 38.

Then, just Gap on out to wherever to heal and restock (I recommend the place by Mayohiga, to pick up more Oath Thread and a whole bunch of Magatama).

Probably should have mentioned this early, but unlike Pokémon's Fly, the Gap Map works indoors and in caves. If you ever need to leave someplace quickly, simply Gap out.

Part 14 can be found here!

Huh...

Well, I'm stuck at the moment.

I just completed the guide for Mayohiga and the Gap Map and stuff, but...

Now I'm lost...

As soon as I figure out where I'm going next, I'll update the guide and such. I found a hole in the ground that I'm assuming has to do with Hell, but there's a Fairy blocking the way and she will not let me by. I don't read Japanese so I have no clue what she is saying or anything. I looked it up and nothing.

So, expect a little delay in the guide while I figure out where in Gensokyo I'm going.

Logically, I'm thinking it must be Hell next since Kanako had to do with Subterranean Animism and the hot springs are at the base of Youkai Mountain if I remember correctly.

If that hole isn't it, I'm guessing I'm looking for a cave or a bridge. No clue though. Going to gap about a bit and see if I can find a place to go. I'm assuming that if I can smash a rock somewhere then that will be a clue, at least.

EDIT: Ah hah! I think I found it! Guide writing go~

Monday, January 12, 2015

PDP Guide Part 12: Mayohiga

Part 11 can be found here.

Back at the healing building, head out and to the right. After a map switch, you will be in Mayohiga.

In the grass here, you can capture Chen and Ran. You can head up through the first patch of grass to pick up a Yin Yang Orb containing Hakurei Shinshu.  If you go to the right past a cat (it kind of looks like a bird from the front) and into the nearby house you will find a Yin Yang Orb containing Prismatic Candy.

Now, head out, and fight the Brown-Haired Fairy who uses a level 34 Kogasa. The first Purple-Haired Fairy uses a level 31 Sunny, level 31 Star, and a level 31 Luna. The second Purple-Haired Fairy uses a level 32 Lily and a level 32 Daiyousei. Up the stairs past them is, of course, a lot of cats (this is Mayohiga, after all). Up and to the right a bit is a Yin Yang Orb containing Paste of the Fog. To the left is a house that you can enter. Hidden behind a table in there is a Yin Yang Orb containing Skill Card 35 (it is tricky to see).

Behind that house a bit is some steps leading to another area. Go through the grass there until you reach yet more steps. Up here is another house. To the left of the house is a grassy patch with a Yin Yang Orb containing a Rosary.

Inside of the house itself, you will find Chen. She will give you a Gap Map. This Map allows you to travel anywhere that you have already been, which is very exciting indeed!

That is really all you can do here, so feel free to Gap away back to that healing building. On the map it is near the top right.

Part 13 can be found here!

PDP Guide Part 11: Youkai Mountain Descent

Part 10 can be found here.

Now, we head into that nearby cave. Hopefully, you still have some Talismans left. Inside this cave, you can encounter Momiji, Yamame, and Hina. Be warned that this area can be kind of a stretch, HP and SP-wise.

Head straight through the cave and you'll run into a Kappa who will fight you with a level 31 Kogasa, level 31 Nitori, and a level 31 Komachi. When you get to a point where you can go left or right, start by going right. You'll run into a Tengu who will fight you with a level 32 Kanako and a level 32 Suwako. Up past her is a Yin Yang Orb containing Moriya Sinshu. Head back down past the Tengu and this time go left. There is a Kappa over there who will fight you. He will use two level 32 Nitoris.

When you get to the end past him, go down and then up the steps. There is a Yin Yang Orb up there that contains Paste of the Fog.

From there, go down the steps and then head up. There's a Ghost up there who will fight you with a level 34 Youmu. There is also a ladder up there which you should take.

Once you get down the ladder, head down and fight the Tengu there that uses a level 32 Aya and a level 32 Hatate. Continue down past the Tengu and go past the nearby steps to her right. There's a Yin Yang Orb there that contains Art of Combat. Now, head a little bit back and up those steps there.

There is a little pink blob a ways in that is actually a Spirit who will fight you with a level 34 Tojiko. Head down the steps to the right of the Spirit and then head up and pick up a Yin Yang Orb containing a Bronze Mirror. Head on back to where the steps were, and then go down.

Further in, you will find a Ghost with a level 34 Kana. Past him is some steps, along with a pathway above the steps.
Take that top path. Then head down and fight the Spirit. The Spirit uses a level 34 Nue. Head down past him and pick up the Yin Yang Orb containing an Onyx Hairpin. Head back up past the Spirit and all the way up to a ladder.

Head down and fight the Purple-Haired Fairy with a level 34 Cirno.  Past her is the exit. Head left and down the steps, then continue on. You will have to fight a Kappa who uses a level 34 Rika. Past her is some grass to the north. In the grass is a Yin Yang Orb containing an Amethyst Hairpin.
The grass here contains Aya, Hatate, Momiji, and Kasen.

Head down the nearby steps and follow the path until you reach an area where you can turn left or right. To the left is a misty area that you cannot get through yet, so, instead, head to the right and down the path. You will come to an area where you can turn up and into a building. Here is, of course, a place to heal and restock. Of note here, you can buy Oath Thread, which is the highest quality thread aside from Fate Thread, and Magatama, which is an even better form of Talismans.

From here, head down and fight a Purple-Haired Fairy with a level 34 Lily. Past her are steps up and steps down. Head up first. Keep on heading up, and then head left. Here, you can fight Tenshi. She will use a level 32 Iku, level 32 Suika (a Power Suika, so it is giant), and a level 34 Tenshi. Down past her is a sandy area. If you head to the left here, and head down the steps and through the grass you will come across a building with a Yin Yang Orb inside. This contains Skill Card 13.

Head back up the steps and hop the ledge to the right. Head on back to the healing house, and it is on to Mayohiga!

Part 12 can be found here!